どうも!フジグチです!
当ブログで目次のデザインをカスタマイズしたので、今回はそのカスタマイズを紹介します。
目次には下記のような読者のユーザビリティを向上させることができます。
- 読む前に一目見て記事に何が書かれているか
- 求めている答えが書いてあるか
- 求めている答えにすぐたどり着ける
この記事では目次の部分的なカスタマイズから、コピペするだけですぐに使えるコードまで用意したので、良ければお使いください。
また、当ブログで使用している「大学ノート風」の目次デザインも公開しています。※現在は使用していません。
※サンプル画像

とりあえずコピペして今すぐ使いたい!という方はコピペで使える目次のCSSの項にお進みください。
記事内のコードは全て「このコードをコピーする」というボタンを押すだけで、コピーすることが出来ますのでご利用ください。
最初にCSSを貼り付ける場所を確認しておきます。
記事内のコードを下記の手順に従い「デザインCSS」に入れてください。


目次のカスタマイズ
自力でデザインを変更したい方のために、CSSの指定方法を書いていきます。
外枠のデザインを変える
目次の外枠のデザインを変えるCSSの書き方を説明していきます。

.entry-content .table-of-contents {
    border: 1px solid #ddd;
}borderの数字の部分を変えると外枠の太さが変わります。
border-topborder-rightborder-bottomborder-leftと個別に設定することも出来ます。
solidの部分は点線の種類です。
などと変えることで線の種類を変えることができます。他にも種類はあるので使いたい方はこちらのサイトを参考にすると分かりやすいです。
外枠の色を変える
#dddの部分は色を表しています。同じ色が6桁の場合は省略できるので3桁となっています。
ご自身のブログに合わせて色の調整をしたい方はこちらのサイトが参考になります。
外枠の角を丸くする
.entry-content .table-of-contents {
    border: 1px solid #ddd;
    border-radius: 8px;
}border-radiusを追加することで外枠の角を丸くすることが出来ます。数字の部分を大きくすると、より丸みが大きくなります。
背景色を変える
.entry-content .table-of-contents {
    border: 1px solid #ddd;
    border-radius: 8px;
    background: #f7f7f7;
}backgroundを追加することで色の指定が出来ます。#~の部分は色です。
目次のデザインを変える
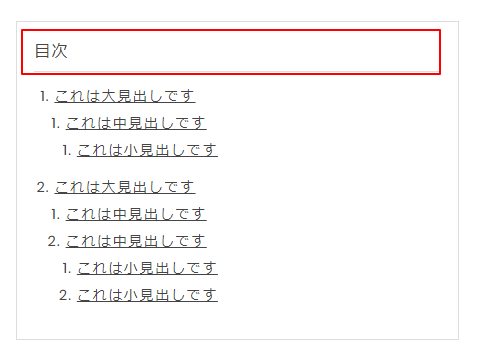
.entry-content .table-of-contents::before {
    content: "目次";
    display: block;
    margin: 0 0 .8rem;
    padding: 0 0 .4rem;
    border-bottom: 1px solid #ddd;
    font-size: 1rem;
}
※この部分はお使いのテーマによっては指定方法が違うかもしれません。
contentの "" ダブルクォーテーションの中の文字を変えることができます。
「この記事の目次」「index」「contents」などと好きな言葉に変えられます。
border-bottomの部分は上述した【外枠のデザインを変える】の方法でスタイルを変えることが出来ます。
font-sizeの値を1remから120%などと変えると文字の大きさを変えることが出来ます。
見出しのデザインを変える
見出しの部分です。
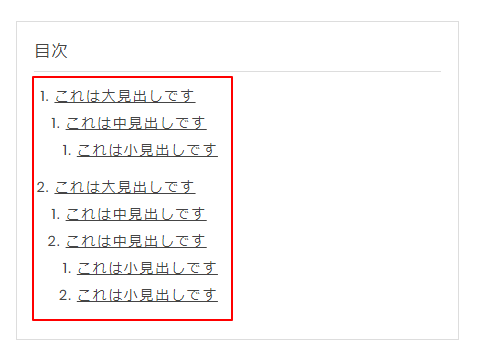
.entry-content .table-of-contents li {
    list-style-type: decimal;
}
リストマーカーの変更の仕方
list-style-typeは見出しの前のマーカーの種類を表しています。 decimelは数字、他に●disc○circle■squareなどもあります。不要の場合はnoneとすることで消すことが出来ます。
見出し下線の消し方
見出しの下線部分です。
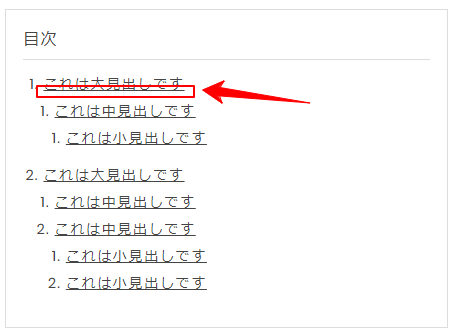
.entry-content .table-of-contents a {
    text-decoration: none;
}
上のCSSを記述することで下線を消すことが出来ます。
反対にunderlineとすることで線をつけることが出来ます。
コピペで使える目次のCSS
記事が長くなりすぎるので、コードを非表示にしてあります。【コードを表示する】のボタンでCSSを表示しコピーしてお使いください。
#6桁(3桁)の数字の部分を変えると色が変わります。ブログデザインに合わせてお使いください。
PC等で表示時の右余白が気になる方はdisplay: inline-block;とすることで文字長さに応じた幅にすることが出来ます。
.entry-content .table-of-contents←このセレクタの{}の中にdisplay: inline-block;と追記する
2020/5/3時点の人気テーマTOP3の【Minimalism】【Brooklyn】【UnderShirt】については、ほぼ確認しましたが、テーマによってはデザインが崩れることがあるかもしれません。その場合は調整をお願いします。
シンプルな目次
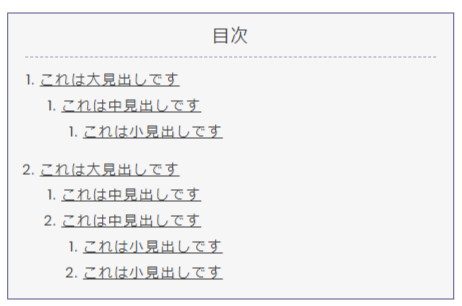
枠線や背景色を変えればどんなテーマにも合うシンプルなデザイン。
テーマにデフォルトで入っているデザインと被っているかもしれません(笑)
/*シンプルな目次*/
.entry-content .table-of-contents {
    margin: 0;
    padding: .7em 1.2em 1.2em;
    background: #f6f6f7;
    font-size: 100%;
    border: solid 1px #5a598c;
}
.entry-content .table-of-contents::before {
    content: "目次";
    position: static;
    display: block;
    text-align: center;
    margin: 0 0 .8rem;
    padding: 0 0 .4rem;
    border-bottom: 1px dashed #9aa0c1;
    font-size: 120%;
}
.table-of-contents ul {
    padding-left: 10px;
}
.entry-content .table-of-contents li {
    margin: .2em 0 1em 1em;
    list-style-type: decimal;
    line-height: 1.6em;
}
.entry-content .table-of-contents li ul li {
    margin: .2em 0 0 1em;
}
.table-of-contents li a {
    text-decoration: underline;
    line-height: 1.6em;
    color: #3f3f3f;
}
目次に太いライン
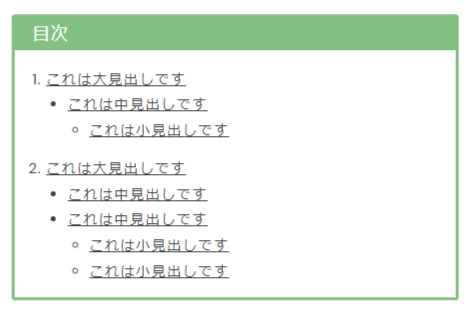
目次に太いラインを入れ、見出しのマーカーを変えてあります。
カラーを変えれば色々なテーマに合わせやすいと思います。
/*目次に太いライン*/
.entry-content .table-of-contents {
    position: relative;
    margin: 0;
    padding: 1em 1.2em 1em;
    background: #fff;
    font-size: 100%;
    border-top: solid 40px #85c083;
    border-right: solid 3px #85c083;
    border-bottom: solid 3px #85c083;
    border-left: solid 3px #85c083;
    border-radius: 4px;
}
.entry-content .table-of-contents::before {
    content: "目次";
    position: absolute;
    top: -33px;
    left: 20px;
    margin: 0 0 .8rem;
    padding: 0 0 .4rem;
    color: #fff;
    border: none;
    font-size: 120%;
}
.entry-content .table-of-contents li {
    margin: .2em 0 1em 1em;
    list-style-type: decimal;
    line-height: 1.6em;
}
.entry-content .table-of-contents li ul {
    margin: 0 0 1em .5em;
    padding: 0;
}
.entry-content .table-of-contents li ul li {
    margin: .2em 0 0 1em;
    list-style-type: disc;
}
.entry-content .table-of-contents li ul li ul li {
    list-style-type: circle;
}
.table-of-contents li a {
    line-height: 1.6em;
}
.entry-content .table-of-contents a {
    color: #454545;
    text-decoration: underline;
}
アイコンフォントを使用した目次

中、小見出しにアイコンフォントを使用し、影で目次の枠を表現してみました。
アイコンを変えたい場合は、こちらにはてなブログでつかえるアイコン全125種を、まとめてあるのでお使いください。
全てのアイコンが、クリックするだけでコピーできるようになっています。
\f039や\f006の部分を、対応したアイコンコードに変更してください。
/*アイコンフォント使用目次*/
.entry-content .table-of-contents {
    position: relative;
    margin: 0;
    padding: 4em 1.2em 1em;
    background: #fff;
    font-size: 100%;
    border-top: solid 5px #72b0ed;
    border-right: 0;
    border-bottom: 0;
    border-left: 0;
    color: #72b0ed;
    box-shadow: 0 1px 5px 2px #e9e9e9;
}
.entry-content .table-of-contents::before {
    content: "目次";
    display: block;
    position: absolute;
    top: 18px;
    left: 60px;
    margin: 0;
    text-align: start;
    color: #72b0ed;
    border: none;
    font-size: 120%;
    font-weight: bold;
}
.entry-content .table-of-contents::after {
    content: "\f039";
    font-family: blogicon;
    display: block;
    font-size: 120%;
    position: absolute;
    line-height: 40px;
    top: 12px;
    left: 12px;
    width: 40px;
    height: 40px;
    text-align: center;
    vertical-align: bottom;
    border-radius: 50%;
    color: #fff;
    background: #72b0ed;
}
.entry-content .table-of-contents li {
    margin: .2em 0 1em 1.5em;
    list-style-type: decimal;
    line-height: 1.6em;
    font-weight: bold;
}
.entry-content .table-of-contents li ul {
    margin: 0 0 1em .5em;
    padding: 0;
}
.entry-content .table-of-contents li ul li {
    margin: .2em 0 0 1em;
    list-style-type: none;
    font-weight: normal;
    font-size: 100%;
}
.entry-content .table-of-contents li ul li::before {
    content: "\f006";
    font-family: blogicon;
    margin-right: .5em;
    color: #72b0ed;
}
.entry-content .table-of-contents li ul li ul li {
    font-size: 90%;
}
.entry-content .table-of-contents a {
    color: #72b0ed;
    line-height: 1.6em;
    text-decoration: underline;
}
アンダーラインで段落分け目次
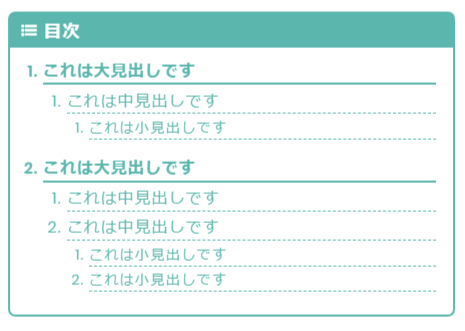
見出し毎に文字サイズを変え、段落が分かりやすいようにアンダーラインで区切ってみました。
/*アンダーラインで段落分け目次*/
.entry-content .table-of-contents {
    position: relative;
    margin: 0;
    padding: .5em 1.2em 1em;
    background: #fff;
    font-size: 100%;
    border-top: solid 40px #5bb7ae;
    border-right: solid 2px #5bb7ae;
    border-bottom: solid 2px #5bb7ae;
    border-left: solid 2px #5bb7ae;
    border-radius: 8px;
    color: #5bb7ae;
}
.entry-content .table-of-contents::before {
    content: "目次";
    position: absolute;
    top: -33px;
    left: 38px;
    margin: 0;
    color: #fff;
    border: 0;
    font-size: 120%;
    font-weight: bold;
}
.entry-content .table-of-contents::after {
    content: "\f039";
    font-family: blogicon;
    position: absolute;
    top: -35px;
    left: 13px;
    color: #fff;
    font-weight: bold;
    font-size: 120%;
}
.entry-content .table-of-contents li {
    margin: .2em 0 1em 1em;
    list-style-type: decimal;
    line-height: 1.6em;
    font-weight: bold;
}
.entry-content .table-of-contents li ul {
    margin: 0 0 1em .5em;
    padding: 0;
}
.entry-content .table-of-contents li ul li {
    margin: .2em 0 0 1em;
    font-weight: normal;
    font-size: 100%;
}
.entry-content .table-of-contents li ul li ul li {
    font-size: 90%;
}
.entry-content .table-of-contents a {
    color: #5bb7ae;
    display: block;
    text-decoration: none;
    border-bottom: solid 2px #5bb7ae;
}
.entry-content .table-of-contents ul li a {
    border-bottom: dashed 1px #5bb7ae;
}
ガーリーな目次
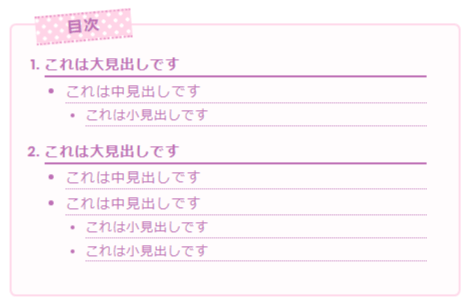
ガテンなおじさんが精一杯考えたガーリーデザインです。
ブログテーマに合わせて色を変更してあなた好みに染めてください///
/* ガーリーな目次*/
.entry-content .table-of-contents {
    position: relative;
    margin: 0;
    padding: 2em 2.5em 1.5em 2em;
    font-size: 100%;
    border: solid 2px #ffd9ea;
    border-radius: 8px;
    background: #fffcfd;
    color: #be6fb5;
}
.entry-content .table-of-contents::before {
    content: "目次";
    display: block;
    position: absolute;
    top: -16px;
    left: 30px;
    width: 120px;
    height: 30px;
    margin: 0;
    padding: 0;
    line-height: 30px;
    text-align: center;
    color: #be6fb5;
    background: #ffd4e7;
    background-image: radial-gradient(#fff 20%, transparent 0), radial-gradient(#fff 20%, transparent 0);
    background-position: 3px 3px, 10px 10px;
    background-size: 15px 15px;
    border-bottom: dotted 3px #e796c7;
    border-top: dotted 3px #e796c7;
    font-size: 120%;
    font-weight: bold;
    transform: rotate(-5deg);
}
.entry-content .table-of-contents li {
    margin: .2em 0 1em 1em;
    list-style-type: decimal;
    line-height: 1.6em;
    font-weight: bold;

}
.entry-content .table-of-contents li ul {
    margin: 0 0 1em .5em;
    padding: 0;
}
.entry-content .table-of-contents li ul li {
    margin: .2em 0 0 1em;
    list-style-type: disc;
    font-weight: normal;
    font-size: 100%;
}
.entry-content .table-of-contents li ul li ul li {
    font-size: 90%;
}
.entry-content .table-of-contents a {
    color: #be6fb5;
    display: block;
    text-decoration: none;
    border-bottom: solid 2px #be6fb5;
}
.entry-content .table-of-contents ul li a {
    border-bottom: dotted 1px #be6fb5;
}
大学ノート風の目次
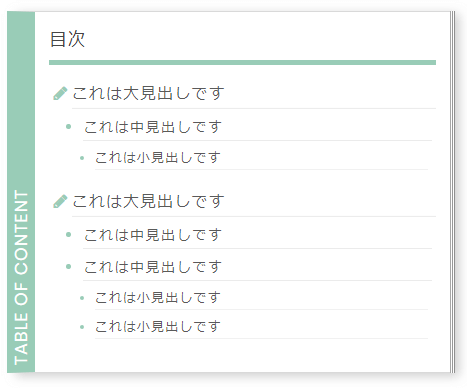
CSSの勉強中ということで、当ブログで使用していた目次です。
見出しが少なすぎるとTABLE OF CONTENTの文字がはみ出します。
アクセントカラーの部分を#c12c58(ピンク)や#3468b1(青)にすることでよく見る大学ノートのカラーに変えられます。
/*大学ノート風目次*/
.entry-content .table-of-contents {
    position: relative;
    margin: 0;
    display: inline-block;
    background: #fff;
    padding: 1em 1em 1.2em 1em;
    border-top: 1px solid #d9d9d9;
    border-right: 0;
    border-bottom: 1px solid #d9d9d9;
    border-left: 28px solid #99ccb7;/*アクセントカラー*/
    box-shadow: 1px 0 0 #959595d4, 2px 0 0 #fff, 3px 0 0 #898989de, 4px 0 0 #fff, 5px 0 0 #858585de, 9px 3px 10px #ababab96;
}
.entry-content .table-of-contents::before {
    content: "目次";
    position: static;
    display: block;
    text-align: start;
    font-size: 120%;
    top: -30px;
    left: 10px;
    margin: 0 0 .8em;
    font-weight: normal;
    border-bottom: 5px solid #99ccb7;
}
.entry-content .table-of-contents::after {
    content: "TABLE OF CONTENT";
    position: absolute;
    display: block;
    transform: rotate(-90deg);
    transform-origin: top left;
    bottom: -20px;
    left: -27px;
    font-size: 120%;
    color: #ffffff;
}
.entry-content .table-of-contents a {
    color: #5a5a5a;
    display: block;
    text-decoration: none;
    background: linear-gradient(transparent 0, transparent 93%, #d8d8d8 100%);
    background-size: 100% 2em;
    line-height: 2em;
}
.entry-content .table-of-contents > li::before {
    font-family: "blogicon";
    content: "\f024";
    font-weight: normal;
    color: #99ccb7;/*アクセントカラー*/
    position: absolute;
    top: 2px;
    left: -18px;
}
.entry-content .table-of-contents li {
    list-style-type: none;
    margin: 0 0 0 1.4em;
    position: relative;
    font-size: 1.1em;
}
.entry-content .table-of-contents li ul {
    margin: 0 0 1em .5em;
    padding: 0;
}
.entry-content .table-of-contents li ul li {
    list-style-type: disc;
    color: #99ccb7;/*アクセントカラー*/
    font-size: .9em;
}
ルーズリーフ風の目次
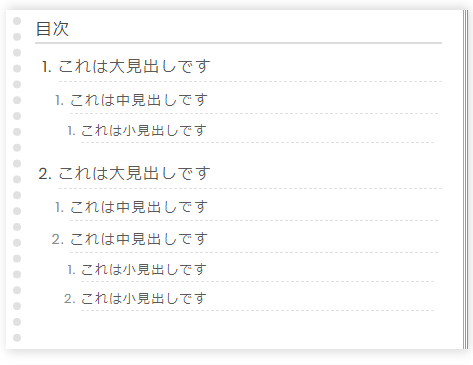
大学ノート風を作った惰性で作ってしまいました。
表紙がない感じで少し寂しいかもしれませんね(笑)
/*目次ルーズリーフ*/
.entry-content .table-of-contents {
    display: inline-block;
    padding: 0 1em 1em;
    background: #ffffff14;
    border-top: 0;
    border-right: 0;
    border-bottom: 0;
    border-left: 8px dotted #e1e1e2;
    box-shadow: 0px 0px 0 7px #ffffff, 1px 0px 0 7px #959595d4, 2px 0px 0 7px #fff, 3px 0px 0 7px #898989de,
                4px 0px 0 7px #fff, 5px 0px 0 7px #858585de, 4px 0px 10px 9px #b8b8b896;
}
.entry-content .table-of-contents::before {
    content: "目次";
    display: block;
    position: static;
    margin: .3em 0 .4em;
    padding: 0;
    border-bottom: 2px solid #ddd;
    font-size: 1rem;
    font-weight: normal;
    text-align: start;
}
.entry-content .table-of-contents li {
    list-style-type: decimal;
    margin: 0 0 0 1em;
    font-size: 1.1em;
}
.entry-content .table-of-contents li ul {
    margin: 0 0 1em .5em;
    padding: 0;
}
.entry-content .table-of-contents li ul li {
    list-style-type: decimal;
    color: #8d8d8d;
    font-size: .9em;
}
.entry-content .table-of-contents a {
    color: #5a5a5a;
    text-decoration: none;
    position: relative;
    display: block;
    line-height: 2em;
    background-image: linear-gradient(90deg, rgba(237, 119, 128, 0) 0%, rgba(237, 119, 128, 0) 50%, #fff 0%, #fff 100%), linear-gradient(180deg, rgba(100, 100, 100, 0) 0%, rgba(100, 100, 100, 0) 95%, #666 100%);
    background-size: 8px 100%,100% 2em;
}
まとめ
出来るだけ確認はしたつもりですが、間違い等があればご指摘ください。
まだまだ初心者ゆえに書き方がおかしいところなどもあるかと思いますが、ご容赦ください。


